Monday 23 May 2016

Unity playing around

I've imported my trees into Unity, and fixed the textures - there was a problem with the program recognising the alpha textures I was using in Maya so I recreated my textures as PNGs with transparency and used the defringe tool in Photoshop to get rid of the greyed edges.

My next issue is trying to stop the program from backface culling because my leaves look invisible from beneath. My last 2 tasks are building a basic environment with trees & natural lighting and making a simple VR video of my environment for Google Cardboard view.


Sunday 22 May 2016

Editing vertex normals for lighting

A simple way to edit the vertex normal angle for lighting. note: transfer attributes is under the 'mesh' panel:


Monday 16 May 2016

Starting Fern

I've started modeling my fern in Maya, it's also a matter of getting the bark right too because my initial base was too simple to mold in zbrush, so I'm extruding parts of it to simulate the bark:

 reference used:

Maple rendering samples

Here is my maple so far, I made a small group of them to give the idea of a scene:


first render without added lights and without grass as polys:


still working on it and need to figure out compositing too :P

Monday 9 May 2016

Reducing render time

After talking to my lecturer about my rendering, it was suggested I really need to reduce my render time because it is far too long for the scene.

In order to do this it is important to separate 'problem' objects into their own render layers and try rendering them separately, reducing the amount of effects on them also makes a difference. this can be done in the Render settings under the render tab so that you can edit the objects separately and remove them from the main scene (problem bushes have been separated):


My class mate also suggested watching this video for more information:


Solving the lighting problem

This time I rendered my scene with another area light in the background so that the ground would not appear too dark and look closer to the kind of lighting emitted by my background image.

In addition, I found out that when you save the image you need to make sure 'save colour-managed image' selected to make sure the image colour is accurate to that of Maya's render. I also changed the image based lighting from 'raw' to 'sRGB' which gave it more depth of colour:


Now the ground is visible which is good, this render is much closer to what I was trying to achieve! :)

Sunday 8 May 2016

Maya paint effects test and render part 2

I kept at rendering and messing with the lighting, and its getting closer to a desirable scene. I used this tutorial for reference:


First trialing the image based lighting (please ignore environment clipping down the bottom:
Second attempt with more environment light emitted in the image based lighting ticked - also final gathering was made sure to be selected in the render settings. There's definitely more shadow depth here too:

After adding a coloured directional light + changing the shadows slightly:

 This is how the last picture looked in Maya - I think i might add an ambient or area light in my scene because the ground still looks very dark in my saved jpeg version...


Maya paint effects and render testing part 1

I decided to play around with Maya's paint effects tools to mock up a quick environment scene basically to play around with rendering techniques and image based lighting:

firstly creating a plane. I just wanted a simple dirt plan with a relatively seamless pattern of dirt on it. I found out if you play around with the texture in the 2Dtexture tab you can edit the direction of it and how often it overlaps etc just by playing with the slider values (right side of image):


Next I discovered that in order to make the paint effects paint to a flat surface you first select it then go to the 'generate' drop list at the top of the screen and click 'make paintable.' once this was done I started to mock the scene up using the visor panel which can be found under general editors or in the generate droplist:


After this I went to reduce my plants polys down to about 2million as they contain a lot of polys making Maya become considerably laggy :/ first you have to convert the Paint Effects to polys though. I tested a first render with sun and sky and it looked like this (bleh):


Thursday 5 May 2016

Maple tree beginning and reiteration

I created the base mesh for my maple in Maya again with relative detail, but with the plan to bring the OBJ into Zbrush, remesh it and then use the decimation master, along with the UV master to create the map. I did this, preserving the base level mesh at about 6500 Polys which is much less than 60k phew..

I subdivided the model about 6 times to add detail and then used the poly paint with a maple bark alpha to give the tree its texture. After that I created the normal, displacement and texture map and used GoZ to import it back into Maya. At first there was issues loading it again so I tried a second time and it worked, then exported and re-imported the object as its OBJ with maps attached then it rendered adequately with the proper connections to the maps. As you can see the normal map sits on my model below in Maya:


Render of tree - seems to lose a bit of the details from the normal map, should mess around with settings a bit. Closer render below it but for some reason my renders always look darker after being saved than they do in Maya :///:

Monday 2 May 2016

Lance finished & problems encountered

I had a bit of trouble with my model as I frustratingly kept trying to put the displacement map on my original base but realised it wasn't adhering because the UV map on my base was different to my new map in Zbrush :P

What I ended up doing was creating my displacement map, texture map and normal map in Zbrush, then using the decimation master to reduce my polys down to 60k from about 200k. This was probably the best I was going to get as a low poly model at this rate because if I reduced it further my UV map began to distort.
Next, I used GoZ to export the mesh and maps to Maya simultaneously. Upon doing that I tried to render out my tree but it wasn't showing up in mental ray. I then exported the project as an OBJ with its maps, and imported the OBJ back into Maya, which caused it to render properly.

So the rest of the time I spent adding leaves to the model. My lecturer suggested making low resolution leaves because in-game they would need to be, however I might create a hi res leafed model in future. Here is the result so far:


After rendering:

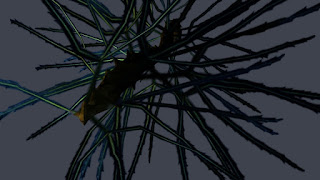
close up of top of Lancewood
render of lancewood with Maya sun & sky